26 July 2016

Weird after effects crashes? Maybe here is the solution.

Troubleshooting some weird after effects crashes?

Trying to open an After Effects project and it keeps crashing? 


Here is are a few solutions that have worked for me in the past.


If you are having unexplained crashes in after effects and left scratching your head, try one or all of these to get the show back on the road.

Full credit to Jonas Hummelstrand over at General Specialist for all these tips. I have simply cherrypicked the ones that I have had success with. Thanks dude!


5 Tips to stop after effects crashing on load

1. Hold down the Shift key while opening an old project 

This will force AE to close all comp viewers, so if one of the comps are causing problems you will be able to identify which comp it is.


2. Try to import the project instead of opening it.

Sometimes this works.


3. Move all source files into a new folder

... so that AE can’t find them, and then locate each source file separately by choosing “Replace footage -> File…” so that you can isolate which source is causing problems.

4. Enable the secret preference

If you are getting rendering errors it might be the codec that is hogging RAM. If you enable “Purge every 20 frames during Make Movie” you will probably get around the problem. 

You can do this in the Secret preferences by holding down the Shift key and then select Preferences… from the menu. In the Preferences dialog box you can then choose the “Secret” option that will give you hidden features (they are hidden since they will cause AE to render more slowly.)

Don’t enable the other checkboxes, just write “20″ in the text field. Also, make sure you enable the “Prevent DLL Address Space Fragmentation” under “Memory & Caches” if your on a Windows system.

5. Image Buffer problems

If you are working with large compositions, images and video files, you may get an error message about creating the image buffer. Here’s a tutorial on how to work around that problem. .. edit: sorry link has died!


Let me know in the comments if they do (or don't) work for you.

After Effects - Center anchor point with one click


Cmd + click the pan behind button. Done!

After Effects Power User - Custom keyboard Shortcuts

Here is a few custom shortcuts i use everyday to make my life easier


Another way to assign shortcuts is via your sys prefs. Note: Use with caution. Sometimes overwrites are buggy and causes stuff to break.


For reference, the cryptic mac keyboard icons deciphered for you


Easy Ease

Easy Ease
Cmd+E

Originally 'edit original', something i never used, never mind used a shortcut for. This saves you from reaching up to F9 or fn+F9

___

Time Reverse keyframes

___

Cmd+Option G
I dont think this is assigned to anything normally, but I've been using it for so long i forget!


3 February 2015

After Effects Keyboard Shortcuts You Probably Never Knew Existed


Remembering these will make you faster and look like a pro in front of clients!

These shortcuts are for Mac. If you're using a PC:
1. I'm very sorry about that
2. Replace cmd with ctrl

nb:
This is aimed at people who know their way around After Effects, however its good for everyone. The earlier you start using shortcuts & the more you use them, your brains are committed to memory and you wont have to think when using them.

Timeline Stuff

Shift selected keyframes on the timeline
alt + &

Un-Solo other layers except this one
alt + click solo

Select layer above / below on timeline
cmd + ↑ & ↓


Create stuff

Or you could just use this plugin if you always forget.

Light = Cmd+Alt+Shift+L
Camera = Cmd+Alt+Shift+C 
Null = Cmd+Alt+Shift+Y
Adjustment Layer = Cmd+Alt+Y

Create solid = Cmd+Y
(modify a solid = Cmd+Shift+Y) 


Modify stuff:
Change Solid settings = Cmd+Shift+Y


Zooming & viewport stuff

zoom to 100% = /
fit zoom to window = Shift+/


Fonts

Increase / Decrease selected font size = Shift+Cmd+ < or >


Additional Tools

This toolbar plugin is great for adding quick access to commonly used tasks.
http://aescripts.com/ft-toolbar/


nb: I'm occasionally updating this list as i find useful more useful shortcuts worth remembering


Changing a timeline to 25 fps In Davinci Resolve


Here's a problem i've had with Davinci Resolve 11 lite. I hear it's a problem with earlier versions too.

Problem

Davinci Resolve wont let me change from 24fps to 25fps

"I've got 25fps footage or image sequence. Resolve recognises it as 25fps but my delivery only lets me export at 24fps."
Your media shows up as 25fps too. Confusing!

Solution

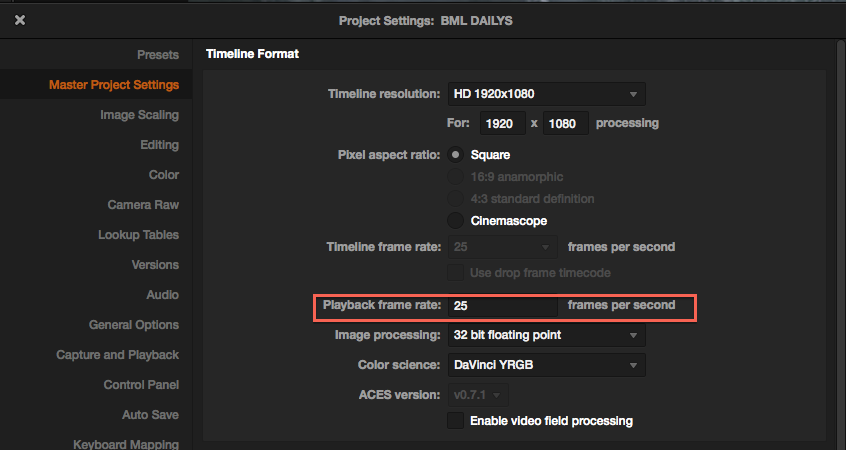
1. Create a new blank project (don't create any timelines or import media into pool yet).
2. Go to project settings and change from 24fps to 25fps.
3. Make sure the first media you bring into your media pool is 25fps and choose to 'change settings to match'.
4. Create a timeline from some 25fps media 

Done! Now all your timelines will be 25fps.


Obviously if you're after a different frame rate just apply this technique to whatever frame rate you need.

This isn't really a problem with Resolve per se, but more of a limitation & something we should be aware of.

9 June 2014

Perfectly Looped Wiggle in After Effects - Floating Camera Effect


Looped Camera Image
This creates a wiggle that loops based on the duration of the composition.

Works great when teamed up with Andrew Kramer's free plugin, Sure Target

Apply this to the orientation or individual X & Y rotation property of a camera for a bit of random handheld motion.

nb: Although its not a perfect solution to create a handheld look, it is a quick and easy way to get some more natural float in your camera moves.


I used this script for a job that needed a camera to fly through a bunch of images in 2.5 d space & had to be perfectly looped.

Original script is from the master of expressions, Dan Ebberts over at Motionscript.com
The extra bit's I've added to make it loop to comp duration are highlighted in orange.

Perfectly Looped Wiggle Expression 

 //CAMERA FLOAT

// This locks the random seed rather than base it on the layer index number  
 seedRandom(12345)   
   
 // Adjust frequency & amplitude here  
 freq = .1;  
 amp = 1.5;  
   
 // Set loop time to duration of the composition - nb can be set to fixed value, eg: "3.0" for 3 secs  
 loopTime = thisComp.duration;  
   
 t = time % loopTime;  
 wiggle1 = wiggle(freq, amp, 2, 0.4, t);  
 wiggle2 = wiggle(freq, amp, 2, 0.4, t - loopTime);  
   
 // Adding 'value' lets you fine tune the original property the wiggle is applied to (eg rotation)  
 linear(t, 0, loopTime, wiggle1, wiggle2)+value;  

Further Reading

For more in depth look at the wiggle expression and how powerful it is over in this tutorial over on Mattrunks' blog.

He shows you how to get a fixed random expression and talks about some cool nerdy wiggly stuff like octavesamplitude & time multipliers. He explains why we have 5 numbers in the wiggle expression instead of the usual 2.

Credit: original expression from Dan Ebberts at Motionscript.com